
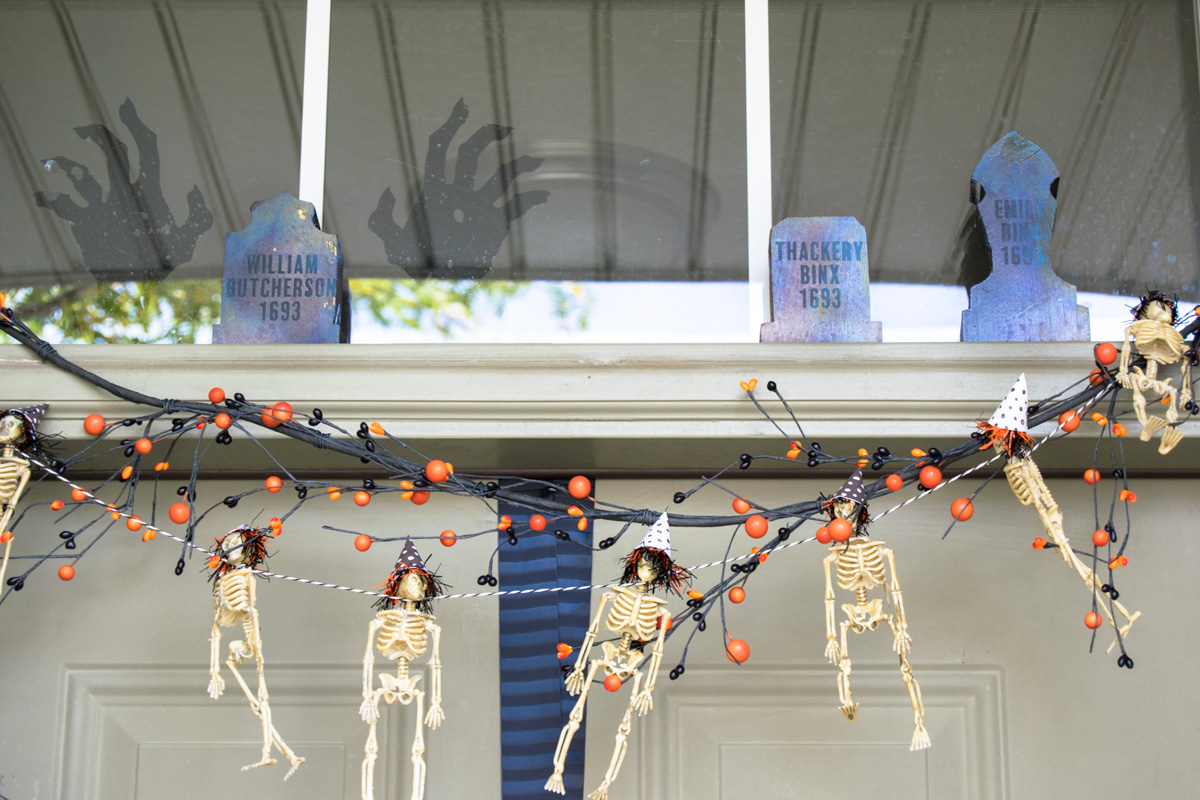
EMILY BINX, THACKERY BINX, AND WILLIAM BUTCHERSON ARE REMEMBERED MAKING THESE EASY HOCUS POCUS TOMBSTONES.

Making these wooden mini tombstones was really quite simple. I just used 3 different colors of spray paint and some pigment ink. Spray until you don't think it needs any more. Learn my techniques below.
The trick to making your wood look like concrete is to vary the color. I had two tones of grey and one tone of brown. I chose the Kryon colors because they have that little removable tab. You want the removable tab so that when it sprays, you will achieve spurts of color rather than a continuous stream.
Supplies for your DIY Hocus Pocus Tombstones
- Cricut or Electronic Cutter
- Black Iron-On Vinyl
- Mini wooden tombstones
- 2 Grey/beige colors of spray paint
- 1 brown/black can of spray paint
- Cricut EasyPress or Iron
- Tombstone Names Cricut File
- Zombie Hands Cricut File

How do I make wood look like cement?
Begin with your lightest shade of grey/beige and use it to base coat your wooden blocks. Next, use your brown but make sure you remove the small plastic tab so they paint will splatter. Do a few strokes of that. Don't do too much and try and focus on the edges. Now use your mid-tone paint and repeat the steps.

Now that you have your big globs of paint on the wood, you'll put the small plastic tab back on the paint and just do an overspray. Hold your paint vertically and then move the can as you spray. Rotate between the three colors and spray in various areas. I had this in a box and kept moving it around so some of the paint would smear. Just add paint until you're happy with the end product.

After the paint had dried on my Hocus Pocus tombstones I took some green pigment ink and blended it into the edges. Use as little or as much as you like, I just like to smear it on there and then use some of your blending sponges to have it look like faux moss.
How do I put vinyl on wood?
Use some standard vinyl and weed your image, use some transfer paper and apply that to your weeded vinyl. Make sure your wood is cleaned and free of any lint or sawdust. Peel the transfer paper off the carrier sheet and you vinyl should be stuck to the transfer paper.
Lay the vinyl image on your piece of wood and use a credit card or scraper tool to press down the vinyl. Slowly lift the transfer paper off of your wood, leaving the vinyl image adhered to your wood.

What I recommend is using some iron-on vinyl, better known as HTV, on your wood. I weeded my image and kept what I want to keep on my carrier sheet. With the Cricut EasyPress, I used 305°F and pressed for 20 seconds. Warm your wooded surface before you place the image. Warm it up for about 5 seconds, place your HTV and then press for the 20 seconds.
There it is, a super cute Hocus Pocus Halloween craft. It ties in perfectly with my Hocus Pocus Door Decoration or my Hocus Pocus Spellbook Door Mat. I have a transom window on my front door and I added these really cute zombie hands out of Cricut Window Cling to remind me when William Butcherson jumped right out of his grave. Grab the Cricut file here. Happy Haunting!

- Free Coffee SVG Files - Boom! Roasted - October 5, 2021
- Free Beer SVG Files - “It's What's For Dinner” - September 7, 2021
- DIY Back to School Banner with Cricut - August 13, 2021

Hey, Let's Chat!