An end table that you can make for under $30? It's true! I had some of the supplies on hand like the stain, white latex paint, and silver spray paint. Create this easy DIY Side Table in less than a few hours!

This looks so chic and clean next to some rustic elements in our family room. I love the ease of this and how easy it was to find these items at my local Target and Home Depot.
This DIY Side Table was so easy to make and it was completely dry by the end of the day. Easy projects like this make it why I want to make all the tables!

Supplies for your DIY Side Table
- Circo Wire Bin (Target Kids Home Section)
- 1″X17 3/4″ Laminated Round
- 1/2″ Cable Masonry Staples (located in the electrical department)
- Latex Stain
- Latex Spray Paint
- Wood Sealer
How do you make a DIY end Table?
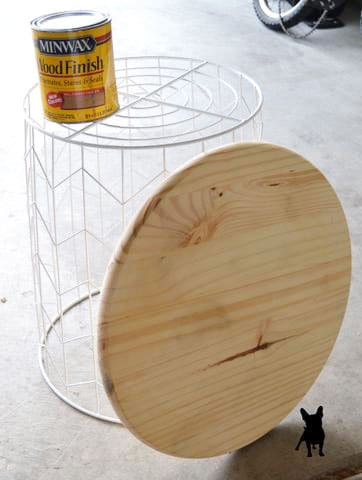
I started first by prepping my wood round. I lightly sanded it, even though it came pre-sanded, and wiped it off with a soft, lint-free rag. I began by using my favorite stain, Minwax Weathered Oak. You can tell how much I love my stain by the dented can above!

You'll want to use a skewer to stir your stain. It allows the smaller particles in the bottom to mix more evenly with the mineral spirits. Dip your rag inside and rub your stain in the direction of the grain of the wood. I did 3 coats of stain with about 1 hour between each coat.

Make sure your edges are also filled with the stain. I did that with a sponge brush and a rag underneath to catch any drips. I only had to do one coat of that.
How do I add accent paint to my wooden topper?
Now to the accent paint. I used my trusty blue painter's tape and sectioned off a piece of the wood. I just chose how much I wanted to be the accent color. There was no science to this part, obviously. I made sure I pressed real securely on the edges to make sure I had no bleeding.

How do I paint the wire base of my DIY Table?
While the top was drying, I sprayed my base. I could have left it white, but the color of white in my house is a creamy white, not a true white which is the color of this base. It would have looked fine, but for someone like me who can't handle even the slightest offset of colors, I couldn't let this fly.
I just used some silver spray paint I had on hand leftover from another art project. I just sprayed it on my grass. Now I've got a pretty silver circle in my front yard! If anyone is looking for me in the sky, you'll know where I am! Just do two coats of the spray paint and spray it 12″ away to get an even coat. Allow it to dry in between coats of spray paint.
How do I secure the base for my Table?
I placed the top that I wanted on the ground face down then measured 2″ all around. I placed the bin so the open side was facing up and placed in the middle of the wood round. I then took my masonry staples and hammered them onto the wood round.

These are very sturdy, I only needed 4 and it held like a champ. I flipped it over, dusted it off, and sprayed a final coat of my quick

I love how this turned out. It was a day project, but each step maybe took about 5-20 minutes each. This has ended up looking really classy and elegant in our room. I love it paired with our old glass medicine bottles. I live for the old and the new. I live to create.
I can't take all the credit. I did get a lot of inspiration from this original wire side table from Jenna Sue. Take a look at the finished product and let me know how you think it looks.

- Free Coffee SVG Files - Boom! Roasted - October 5, 2021
- Free Beer SVG Files - “It's What's For Dinner” - September 7, 2021
- DIY Back to School Banner with Cricut - August 13, 2021


ericasooter says
This is gorgeous and so easy to do! I might just have to go out and get the supplies to make my own… nice work! 🙂
Frenchie says
Thanks so much! It was so fun to make. I want to see everyones variations!
Jillene @ "inkhappi" says
LOVE it! This is so do-able and I like that it can be changed up to match any decor. I want to make it now! “happi” weekend ~Jillene
Frenchie says
Thanks so much! Go and do it! I want to see pictures 😉
janjax says
so cute Love it.
Sam @ Raggedy Bits says
What a sweet little table! I love the look that you gave the wooden top!!
Thank you so much for sharing your fun project over at Waste Not Wednesday this week!
Lina says
What a great idea! 🙂 Thanks for sharing at Sew It Cook It Craft It.
Grandmas House DIY says
I love this! Thanks so much for sharing with us at the To Grandma’s house we go link party last week, I’ll be featuring you tomorrow morning when the new party starts!
Lindsay says
Thank you for the feature!
Denise says
Awesome side table. Thanks for sharing with us at the Waste Not Wednesday link party. Looking forward to seeing more from you this week.