
Have you ever wondered how to upload an image into Cricut Design Space? I'm going to show you how easy it is to upload your own .jpeg files so you can cut them on your Cricut.
 This post contains affiliate links. Thank you to Cricut for sponsoring this post.
You first want to find an image you like or your can scan a drawing of your own and convert it to a .jpeg file. I found these ladybugs on Adobe Stock because I have an account. You can easily find an image online that you like and use it for personal use. Please don't take other people's hard work and pass it off as your own unless you pay for it. 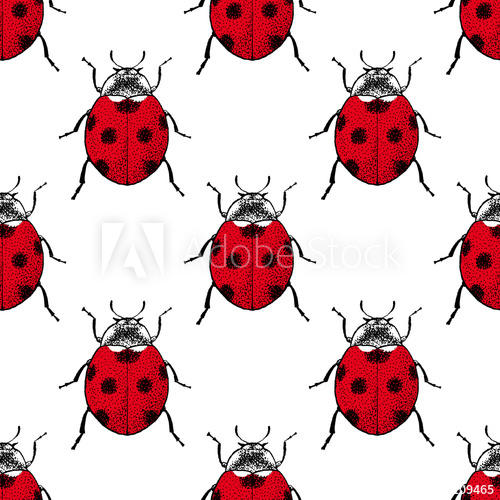

Supplies -
- Cardstock (this one is from Paper Source)
- pins
- canvas
- Cricut Explore Air™ 2
 So because we're uploading an image of your own, we first want to make sure it's saved to our computer in the right format. Cricut Design Space accepts .jpeg, .png, .svg, .gif, .bmp and .dxf files. If you have any other file that needs to be converted, there are websites dedicated to converting your file into the file you desire, you just need to google it and it'll show up.
Now let's get to it, you're going to select to make a new canvas by clicking on the Create New Project link. Next, select the upload images on the left side of the screen.
 And then select Upload Image.
 Now you'll select Browse and find your image that you've saved to your computer and select Open.
 Once you've brought in your image, it will be time to edit it. For .jpeg and .png, there is the option to select and deselect things you want and don't want. I like to choose complex image for more detailed images and simple for images I just want to cut outer edges of. For the other files, it will bring it in and you can just select right away if you want it to be a cut or print then cut file.Select the negative space and whatever part of the image you don't want using your mouse and select Continue. Whatever you do not want to show will be the transparent squares that are in the background. After you've edited your image, the next screen will allow you to choose whether you want a Print then Cut image or just a Cut image. When you choose the cut, only the places that were not selected in the edit screen will be cut. Go ahead and save your image with some keywords so you can search for it later and then you'll also be able to find it by the other images you've uploaded. Select it and add it to your canvas.I cut out 12 images of the ladybug, 3 of each color and arranged them on my 10″x10″ canvas.You'll next use some hot glue to secure them in place. This is not necessary but these are tiny pins here for my apothecary style art so I didn't want them sliding all over the place.
 Once they're at the place you want them at, go ahead and add your mini pins to make it look like a small piece of art just like the Japanese style art with live bugs and frame them.Add it to your mantel or shelves and enjoy this Valentine's Day art project you made all on your own using your own images you've uploaded into Cricut Design Space.
Comments submitted may be displayed on other websites owned by the sponsoring brand.
This is a sponsored conversation written by me on behalf of Cricut. The opinions and text are all mine.

- Free Coffee SVG Files - Boom! Roasted - October 5, 2021
- Free Beer SVG Files - “It's What's For Dinner” - September 7, 2021
- DIY Back to School Banner with Cricut - August 13, 2021

Ramona Pattersom says
I am having trouble after I upload the imagine.. it uploads then im not hitting or doing something right to clean it up and save it
Lindsay says
Are you uploading a jpeg or svg? Svg files won’t allow you to edit but jpegs will. After you upload, select what type of level you want to edit your image. You’ll select the areas that you don’t want to include and then press ok. You’ll click on whether you want to save it as a printed image or a cut image and then press save.