
Making a paper wreath is easier than you could ever imagine with the help of your Cricut Explore Air 2. Learn how easy it is to create this Christmas Paper Wreath below using non-traditional Christmas colors.
Cricut asked me recently to create a project using my Cricut Explore Air 2 and I thought to revamp my Christmas Paper Wreath I made a few years ago for the Design Space Star challenge and use some non-traditional Christmas colors this time around.

Supplies needed for your Paper Wreath
- Cricut Explore Air 2
- Natalie Malan Belle Citron Scrapbook Paper
- Cricut Pearl Paper, Pastels Sampler
- Paper Wreath Cricut Design Space File
- Light Grip Mat
- Cricut Scoring Stylus
- Hot Glue Gun & Hot Glue Sticks
- Wreath Form
- 1.5″ Ribbon
- Straight Pins
I was able to find everything I needed for this project at my local Joann store. I like to hit them all cause I live in a pretty populated area where I have the option to do that. If you don't have local crafting stores nearby, shopping on Cricut.com is a great option and they always have great sales happening.

How to assemble your Christmas Paper Wreath
Begin by using your Cricut Explore Air 2 to cut and score all your paper. I made about 5 sets of the cuts so that I would have a lot of options. Set aside the pieces that are similar into separate stacks and then set aside.
Next, you will wrap your wreath form in the ribbon. Use a bead of hot glue and adhere the end to the wreath on your back end. Completely wrap the ribbon around the wreath form using a bead of hot glue about every 8-10 wraps. Use another bead of glue on the backside of the wreath and then cut off the excess ribbon.
Start with your larger laurel pieces and use the straight pins to pierce them into your wreath form. I also just used my thumbnail or you can use a scraper tool to curl the edges of the leaves. Alternate the layout so that you'll have dimension.
If it's looking ugly at this point, you're on the right track.

Now it's onto the holly leaves. You're going to start with the larger pieces and place them randomly all over your wreath on the fronts, sides, and back of the wreath. Fill it in but leave a few leaves for the end.
Now you'll do your spruce sprigs and crumple them up before you attach them. For your sprays, you'll use some tweezers and roll them with small amounts of hot glue along the edges to get a tight roll. Find some empty spots and add those in. You'll have to be more creative with these because they don't lay flat and it's a little harder to hide them.

Finally, you're going to add your holly berries. Because Cricut's premium cardstock is double-sided and Natalie Malan is uber-talented, you're going to alternate the designs. Her paper is perfect for this homemade Christmas paper wreath.
5 Reasons Why I Love My Cricut Explore Air 2
I've had all the models of Cricut except an Expression and the Explore Air 2 is the model I seem to use the most next to the Maker. I love the precision of cuts I get and I like the 2X speed factor on certain materials for cutting and writing.
The Bluetooth connection allows me to have the machine in a convenient part of my craft area without taking up space on my desk. You can cut 100+ different materials and you can push the limits on what you try yourself at home.
1. print then cut feature
I love the print then cut feature and you can see my post below about some of my favorite labels I made for a baby shower. The quality always turns out awesome and I love that they have the bleed feature so that I have no white edges on any of my projects.

2. infusible ink cutting capability

For Halloween, my family and I were Toy Story characters so of course, I had to use my Infusible Ink to make a bag. The small details in the font are perfectly circular and with one pass it cut through perfectly. I love that I can add small details like this into my costumes and it can all be made with my Cricut Explore Air 2.
3. Bluetooth capability

The Cricut Explore Air 2 can cut from anywhere you have Bluetooth capability. I love to be able to design from my desktop and then go into another area of my home where my Cricut is and cut from my phone. I don't have to worry about losing a project or running back and forth, it's the best!
4. Cricut Explore Air 2's come in an array of colors
I've had the Mint, the Wisteria, and now the Sky Blue and I can't wait to get my hands on the Fuschia one or even the Matte Black one. The colors are never-ending and I love that I can have them match my decor perfectly every time.
5. My Cricut is dependable and durable
During this project, I cut 20+ sheets of cardstock. I rotated two mats and just kept chugging along. I never had a paper shred on me, I never had to change my blade, and my Bluetooth was dependable with every pass.
I've put my Cricut's through some things, way more than the average user would and I've always been happy with the quality of cuts and the quality of the machine. I love Cricut machines and I definitely recommend getting one.
Here are some of my favorite projects I've made with my
Cricut Explore Air 2

Cutting faux leather is really easy on your Cricut Explore Air 2. You can cut up to 3 oz. with the Deep Cut Blade and I wouldn't go thicker than that. The thinner the leather, the easier it is to cut and assemble into a bow. I do recommend placing your leather flesh side up to avoid any fuzz getting on your mat.
If you have a Cricut Maker, learn how easy it is to cut leather using that machine here. There are a lot of the same principles that you can use on your Cricut Explore Air 2 when it comes to cutting leather. Follow these easy tips to learn how.

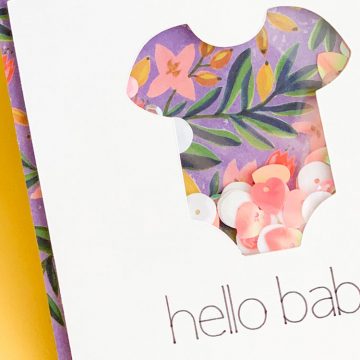
Using the Print Then Cut option on the Cricut Explore Air 2 is another favorite thing of mine. I can create easy labels like I did for these baby onesie gift boxes and use the HEX code to create the exact color I need to be printed.

To cut felt with your Cricut Explore Air 2, you need to stabilize your felt and use a fresh blade. You can use a bonded fabric blade or a fine point blade. When using the bonded fabric blade, it's a rose pink color so that you can always use that blade on fabric and not dull the blade on paper.
Cori from Hey, Let's Make Stuff has an excellent tutorial on what blades and what blend of felt to use when cutting felt with your Cricut. Add some Foil Iron-On to add shimmer just like the real coins. My kids still use this 2 years later and have a little drive-thru restaurant. It's a huge hit at our house still.

This tutorial shows just how much I love using Iron-On Vinyl on materials other than fabric. Using your Cricut Explore Air 2 to cut small details that you normally wouldn't get perfectly. These little tombstones are about 3″ high and the tiny words are perfect to create these fun Halloween Hocus Pocus decorations.
Baby, It's Really Freaking Cold Outside Mug
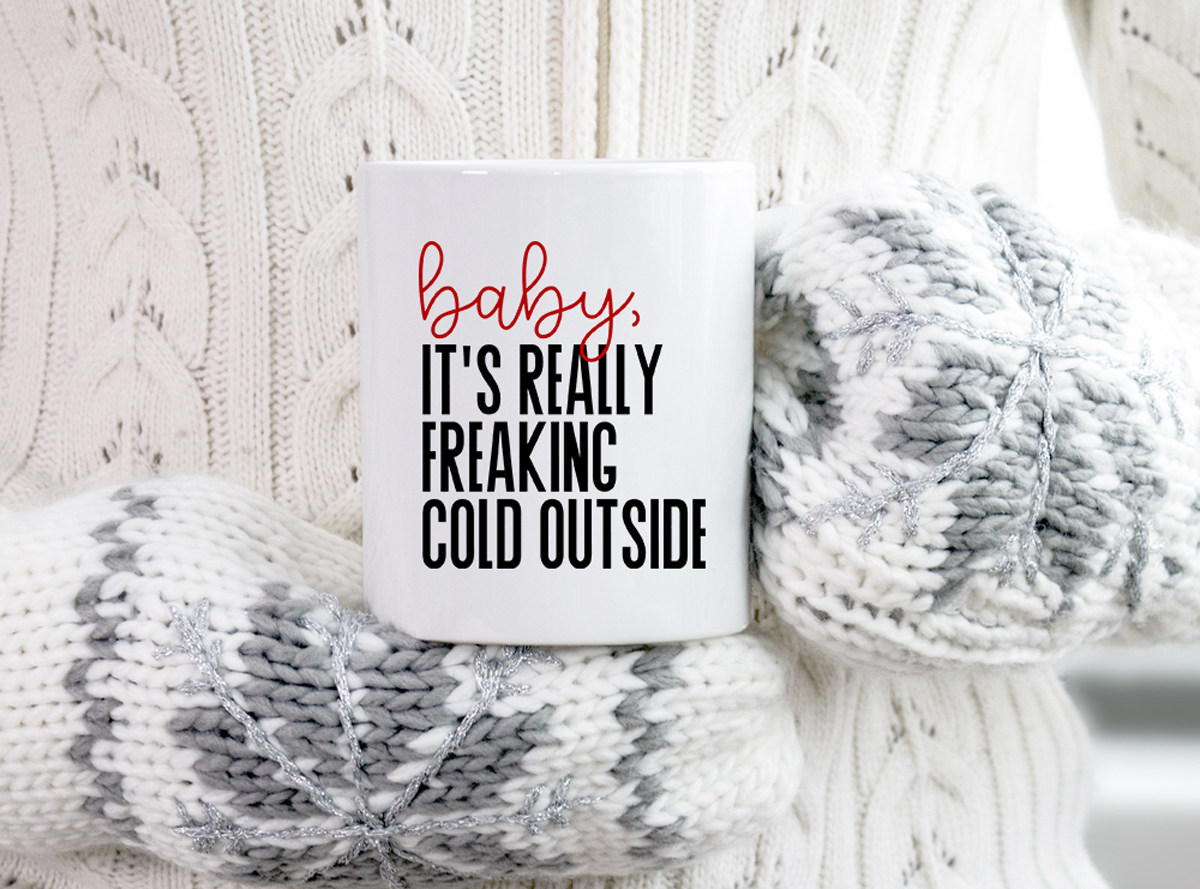
Create custom mugs for the holidays or layer your adhesive vinyl and apply them on tumblers to create some simple gifts for others. Use the permanent adhesive vinyl so that it will be dishwasher safe. The Cricut Explore Air 2 perfectly kiss-cuts the vinyl on the Smart Dial setting and just twist the knob to the setting and select go.
Should I buy a Cricut Explore Air 2?
Absolutely. They're a less expensive machine than the Maker and if you don't think you're going to be engraving or debossing things, this is the way to go. I get so many cuts out of my pieces of vinyl and papers that this will really be a great investment for you too.

- Free Coffee SVG Files - Boom! Roasted - October 5, 2021
- Free Beer SVG Files - “It's What's For Dinner” - September 7, 2021
- DIY Back to School Banner with Cricut - August 13, 2021

Hey, Let's Chat!